
Here is Dev Swanson, Ethereum smart contract researcher and enthusiast. Even we are focusing on Ethereum (and also many other networks & blockchains) much, but we will also talk about how to create a token in Solana Network which is a very popular network right now. There are some cool functions that you can use with this token in Solana Network. We will talk about how to create your own token in Solana below.
Important#1: If your computer is old, slow and laggy, will strongly recommend you to not to do this because your computer could be jammed, or you need to change to a newer and less laggy computer in order to proceed with this guide.
Important#2: If you are lack of patience or have extreme low IQ level, this guide is not very much suit you because there will be a lot of applications and also a lot of steps inside this guide. This is not as easy as you think.
So today, let me introduce you some useful tips on How to Create Your Own Token in Solana Network. Are you ready?
[Only for research and testing, you may start your own tokens using this method]
Solana Token(How to Add & Remove Liquidity in Raydium, Block Transfer & Blacklist Buyers, Print Token Supply)

Part 1: Early Preparations
1)Download and Install Visual Studio Code (Just click Yes / Next)
Click this: https://code.visualstudio.com/download

2)Download and Install Latest Node.js (Version may vary from picture), (Just click Yes / Next while doing pre installation steps)

After you done installing, Restart you computer.

3)After Restart, Click "Start" button or "Windows" button of your computer, search "command prompt", then click Command Prompt


4)Copy and paste the below code into it (red arrow) and click enter:
npm install -g ts-node


5)Copy and paste the below code into it and click enter:
npm install -g typescript

6)Close the Command Prompt

7)Restart your computer

8)After Restart, click "Start" button or "Windows" button of your computer, search "command prompt", then right click Command Prompt, and select Run as administrator

9)Copy the below code:
cmd /c "curl https://release.solana.com/v1.18.18/solana-install-init-x86_64-pc-windows-msvc.exe --output C:\solana-install-tmp\solana-install-init.exe --create-dirs"
Then go back to Command Prompt and click right click in the area (red arrow) as shown in the picture below, then it will auto paste the code and run it.

10)After that, Copy the below code:
C:\solana-install-tmp\solana-install-init.exe v1.18.18
Then go back to Command Prompt and click right click in the area (red arrow) as shown in the picture below, then it will auto paste the code and run it.

11)Then you will see this message "Press the Enter Key to Continue"
Click enter

12)After that, Close the Command Prompt, and Restart your computer
13)After Restart, Create a new document in your screen, right here we name it "solana token"

14)Search and open Visual Studio Code that you installed recently

15)Click on the button as shown in the picture below

16)Click Open Folder, then select the new document that you created just now

17)Since this is your own document, Click "Yes, I trust the authors"

18)Click on the three dots button as shown in the picture below

19)Then scroll your mouse to Terminal, then click New Terminal

Part 2: Start to Create Token in Solana
20)Copy and paste the below code into it, click enter, then wait for the process to finish:
npm install @metaplex-foundation/mpl-token-metadata --save


21)Copy and paste the below code into it, click enter, then wait for the process to finish:
npm install @solana/web3.js --save

22)Copy and paste the below code into it, click enter, then wait for the process to finish:
npm install @project-serum/anchor --save

23)Now, we need to create a wallet account. Copy and paste the below code into it, click enter:
solana-keygen grind --starts-with 1:1

24)After that, you will see the word like 1XXXXXXXXXXXXXXXXXXXXXXXXXXXXXX.json like shown in the picture below

25)Right now, you need to Copy and edit the below code:
solana config set --url https://api.mainnet-beta.solana.com --keypair <your keypair json>
-Example: solana config set --url https://api.mainnet-beta.solana.com --keypair 1XXXXXXXXXXXXXXXXXXXXXXXXXXXXXX.json

You need to change the word 1XXXXXXXXXXXXXXXXXXX.json into the your actual .json.
How to find your actual .json : Please see step 24
How to copy and paste your actual .json:
Move your mouse, click left click, hold and drag your whole actual .json like shown in the picture below, then click right click.

After you change the json in your actual json (which mean you edited the code) inside the code, Copy and paste your edited code into terminal, Click Enter
-Example: solana config set --url https://api.mainnet-beta.solana.com --keypair 1XXXXXXXXXXXXXXXXXXXXXXXXXXXXXX.json

26)Then, you will see this message as shown in the picture below.

27)Now, visit https://www.pinata.cloud/
Create an account in Pinata Cloud.

After you verified your email, follow and do as shown in pictures below.
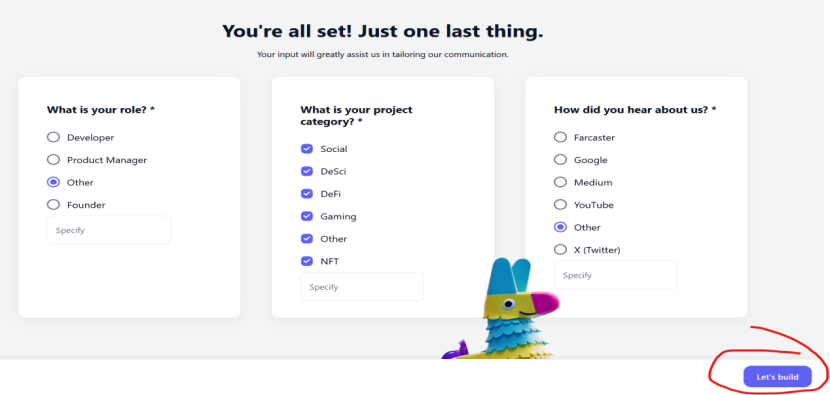
Click not a developer...

Select a Free Plan...

Click let's build...
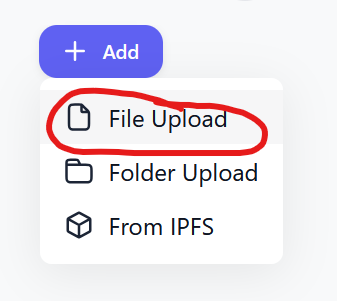
28)After you done all the things above, you will see a page as shown in below.
Click Add, then Click File Upload

29)Click the word "Click to upload a file" to upload a file

30)Right now, select your Token Logo which can be a picture or GIF whatever, then click Upload

31)After you upload your Token Logo, you will see the file in your page, click the file as shown in the picture below.

32)After you click the file, you will be redirected to another website and you will see your token logo.
Save and Copy the link of this website because we will going to use it later.

34)Now create a txt file in your computer, name it whatever you like.

Copy and Paste the below following into the txt file.
{
"name": "Your Token Name",
"symbol": "$SYMBOL",
"description": "Your Token Description.",
"image": "link of token logo image/picture that you save just now"
}
Now you need to do some settings on your own token information. After you done the token setting, remember to Save the file.
-name: Provide your token name
-symbol: Your token symbol
-description: What is your token about & your message
-image: For link of image, please refer to step 32.
Example as below:
{
"name": "DevToken",
"symbol": "$DVET",
"description": "Token created by Dev with little or no values, do not buy.",
"image": "https://xxxxxxxxxxxxxx.mypinata.cloud/ipfs/xxxxxxxxxxxxxxxxxxxxxxxxx"
}
34)Now go back to Pinata Cloud, Click Add, Click File Upload

34)Select the txt file that you have done just now (with the token setting inside it), and upload it

35)After you upload the txt file, you will see the file in your page, click the file as shown in the picture below.

36)After you click the file, you will be redirected to another website and you will see your token information.
Save and Copy the link of this website because we will going to use it later.

37)Now, open Visual Studio Code, do you still remember your keypair json/ your actual json? Example, 1XXXXXXXXXXXXXXXXXXXXXX.json (You may look at step 25). the 1XXXXXXXXXXXXXXXXXXXXXXXX (without the .json) will be your temporary wallet address.
You need to send/ put/ deposit at least 0.1 SOL into that wallet address, you can withdraw SOL from Centralized Exchanges or from any of your solana wallet (Phantom wallet etc….), Network will be Solana network.
Now you need to copy that wallet address, so that you can send SOL to that wallet address.
Move your mouse, click left click, hold and drag your whole wallet address (without .json) like shown in the picture below, then click right click.

Now you copied the wallet address and you are ready to paste it to anywhere where you need to put it in order to send some SOL into the wallet address. (Remember: You need to send/ put/ deposit at least 0.1 SOL into that wallet address, Network will be Solana network)
38)After you successfully send at least 0.1 SOL into that wallet, go back to Visual Studio Code.
Copy and paste the below code, and click enter:
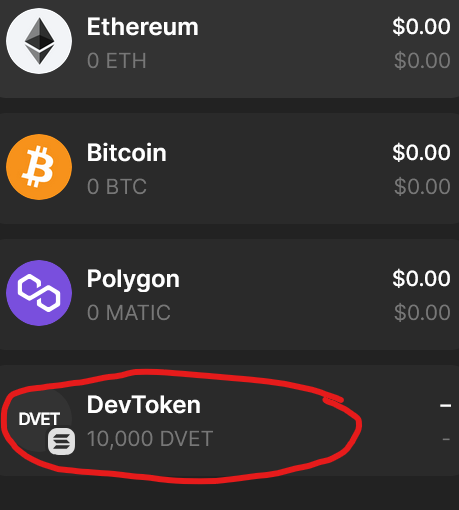
solana balance

Then you will see your wallet SOL balance show up.

39)Copy and paste the below code, and click enter, please wait for at least a 5 seconds:
spl-token --program-id TokenzQdBNbLqP5VEhdkAS6EPFLC1PHnBqCXEpPxuEb create-token --enable-metadata --enable-freeze
After a few seconds, you will see this message show up, as shown in the picture below.

The Address will be the address of your token, you need to Copy and Save it (Token address will be inside the red bracket as shown in the picture below)

40)Right now, copy the below code, and change those info into your token information:
spl-token initialize-metadata <TOKEN ADDRESS> <YOUR_TOKEN_NAME> <YOUR_TOKEN_SYMBOL> <YOUR_TOKEN_URI>
Example:
spl-token initialize-metadata BXXXXXXXXXXXXXXXXXXXX DevToken DVET https://XXXXXXXXXXXXXXXX.mypinata.cloud/ipfs/XXXXXXXXXXXXXXXXXXXX
You need to:
-Insert your token address (see step 39 to find your token address)
-Insert your token name (without space)
-Insert your token symbol
-Insert the txt file link from Pinata Cloud (see step 36 to find your txt file link from pinata)


After you done inserting all the information, copy your edited code and paste into it, click enter, then wait for a few second.
41)After a few seconds, you will see a message as shown in the picture below.

42)Right now, copy the below code, and change the token address into your token address:
spl-token create-account <Your Token Address>
Example:
spl-token create-account BXXXXXXXXXXXXXXXXXXXXXXXXXXXXXXX

Copy your edited code, paste into it, and click enter.
43)Then, you will see this message as shown in the picture below, those are not important things, so we will proceed to next step.

44)Copy the below code, and change the token address into your token address, and also how much amount of token you want to create (If you want to create 10000 amount of your token, just write 10000 in the Token Amount):
spl-token mint <Token Address> <Token Amount>
Example:
spl-token mint BXXXXXXXXXXXXXXXXXXX 10000
You need to:
-Insert your token address (see step 39 to find your token address)
-Insert how much amount of token you want to create (If you want to create 10000 amount of your token, just write 10000 in the Token Amount)
In the picture below, if you decide to create 10000 amount of token, just write 10000 like shown in the picture below.

After you done editing those parts, copy and paste your edited code into it, and click enter.
45)After you click enter, you will see the message as shown in the picture below, those are not important things, so we will proceed to next step.

46)Right now, if you haven’t install any Solana wallet, or you are new to Solana, you need to install of those Solana wallets:
If you don’t have any accounts on any solana wallets, Download Phantom Wallet desktop: https://phantom.app/
You need to have Solana wallet in order to receive the token you created and add liquidity afterward.
Important: You need to add fund to your Phantom wallet solana address to order to activate it, or else you will encounter errors in the upcoming steps.
Please send at least 0.1 SOL into your Phantom wallet in order to activate it.

47)After you done setting up your Solana wallet, Copy and save your wallet address of your Solana wallet, which is Phantom wallet that we will use here.
Click the Copy button of Phantom wallet to copy and save your Phantom wallet solana address

48)You need to fund at least 0.1 SOL into your Phantom wallet solana address in order to activate wallet or else you will encounter error in this step. Now back to Visual Studio Code, Copy and edit the below code, Change token address into your token address (step 39), then insert how much token you want to send to your Phantom wallet, and also insert your Phantom wallet solana address into wallet address:
spl-token transfer <token-address> <token-amount> <wallet-address> --fund-recipient
Example:
spl-token transfer BXXXXXXXXXXXXXXXXXXXXXXXX 10000 FXXXXXXXXXXXXXXXXXXXXXXX --fund-recipient
You need to:
-Insert your token address (see step 39 to find your token address)
-Insert how much amount of token you want to transfer to Phantom Wallet address, Usually we will send it all. (If you want to send 10000 amount of your token, just write 10000 in the token amount)
-Insert you Phantom wallet solana address (see step 47 to find your Phantom wallet solana address)

After you done editing those parts, copy and paste your edited code into it, and click enter.
49)You will see this message show that the transfer is successful (If you didn’t fund your Phantom wallet, you will 100% encounter errors)

Now your token is now inside you Phantom wallet.
50)Now go to Phantom wallet app in your desktop, Copy your token address (see step 39 to find your token address)
In your Phantom wallet, scroll down, click Manage token list

Then paste your token address into the space

Then you will see your token, if the button isn’t switch on, switch it on

51)Back to Phantom wallet, click into your token
Click more

Click View on Solscan

52)In this Solscan page, click the blue words of your token address.

Then you will see your token with the name and the logo which is totally based on your txt file in Pinata Cloud.
Right now, your token creating process is finished, we will move to the next part which is adding liquidity in the most popular decentralized exchange in Solana which is Raydium
Part 3: How to Add Liquidity in Raydium Solana
Add Liquidity in Raydium.
53)First go to https://raydium.io
54)Click Liquidity

55)Make sure the setting of Priority is Turbo, and click Connect Wallet

56)Click Phantom Wallet, and now your wallet is connected to Raydium

57)Click Create

58)Click Continue

59)Back to Phantom wallet, click into your token

Click more

Click View on Solscan

52)In this Solscan page, click the copy button in order to copy your token address.

53)Go back to Raydium page, click select

54)Paste the token address into the space as shown in the picture below

55)After you paste your token address, you need to edit the symbol and name in your token symbol and token name

Symbol: Insert your token symbol
Name: Insert you token name
After you done the editing, click Add User Token.

Symbol: Insert your token symbol
Name: Insert you token name
After you done the editing, click Add User Token.
56)Then, click your token as shown in the picture below

You will see your token show up as shown in the picture below

57)Now, click Select (under Quote token)

Then click Solana token

57)Choose 0.25% as Fee Tier, and click Continue

58)Now we will need to set the initial price of our token, we will keep it simple with the formula below:
Initial price = amount of Solana token you want to add as liquidity / amount of your token you want to add as liquidity
Example, if you want to add 1 SOL token, together with 10000 of your token, the initial price will be (1 SOL/10000) = 0.0001 SOL per your token
Initial price = 1 SOL / 10000 your token
Initial price = 0.0001 SOL per your token
You may do the simple calculation and come out with your own initial price.
We will insert 0.0001 as Initial price as an example, as shown in the picture below.

After you done writing your initial price, click Continue.
59)Now you choose how much token you want to add as liquidity, but since we already decide how much token we want to put into liquidity (see step 58). You may just click Max.

60)After you select how much token you want to add liquidity, the amount of SOL you need to add will be auto calculated by the system. (If you click Max just as the example below did, you will see there is an extra little bit of 0.25% of Solana token you will require to add, this is normal)
Click Preview Pool

61)Then click Confirm Deposit

62)You will see your Phantom wallet pop-up. Confirm the transaction.

As you can see from the transaction, the fees just to add liquidity in Raydium is around 0.5 SOL token because we add like 1 SOL as liquidity, but the transaction will cost us like 1.5 SOL.

Important: Remember the fees just to add liquidity in Raydium will be around 0.5 SOL which is the fees that Raydium charge.
63)After you successfully added liquidity, You will see the message as shown in the picture below.

64)Back to Phantom wallet, click into your token

Click more

Click View on Solscan

65)In this Solscan page, click the copy button in order to copy your token address.

66)Now we back to Raydium, Click Liquidity

67)Paste your token address into the search bar as shown in the picture below

68)You will see your token show up with logo, click your token

Then you will see your liquidity pair is show up here. (Sometimes it will not show up because the Raydium page haven't update that fast, probably need to wait for few minutes or next days if your liquidity pair didn't show up.)

Congratulation, You already added liquidity into your token.
Part 4: How to Use Solana Token Functions
How to Block Transfer/ Blacklist Buyers
69)Now assume that you have a buyer that buy your token, you can view the chart and price action of your token in some chart apps like Dextools.
Dextools is a pretty good chart app because it will shows up your token (after you add liquidity) and it is fast. If you try other chart app like Dexscreener, your token may not show up on time for no reasons.
Visit Dextools and paste your token address into search bar and you token will 100% show up after you added liquidity: https://www.dextools.io/app/en/pairs
I believe you know how to use chart tools better than I do.
A)You can get information about which wallet address/addresses buy your token.
Right here, we got one buyer (as shown in the picture below), Click into the blue word address as shown in the picture below.

B)Then you click the wallet icon as shown in the picture below.

C)Click the copy button of the token account address that have your token symbol and token logo, as shown in the picture below.

The token account address that you copied just now WILL BE THE TOKEN ACCOUNT
D)Now back to Visual Studio Code, copy and edit the below code:
spl-token freeze <TOKEN ACCOUNT>
Example: spl-token freeze AXXXXXXXXXXXXXXXXXXXXXXXX
You Need to: Insert the token account that you copied just now

After you done editing those parts, copy and paste your edited code into it, and click enter.
Then you will see message like this as shown in the picture below.

*#Now the wallet address that buy your token cannot transfer the token out or sell the token back.
How to Unblock Transfer/ Remove Buyers from Blacklist
70)Now assume that you have a buyer that buy your token, and you already blacklisted his/her token account, you wanna remove it from blacklist.
If you remember the token account which you blacklist before, you can go straight to step C below.
If you forget about the token account which you blacklist before, follow the steps below:
A)Go to Visual Code Studio, You can get information about which token account you blacklisted before by scrolling up the codes in terminal.
Scroll until you see message like this as shown in the picture below, please scroll slow and look more carefully.

B)Click and drag your mouse until the cover all the token account, then click right click to copy it, as shown in the picture below.

C)Now back to Visual Studio Code, copy and edit the below code:
spl-token thaw <BLACKLISTED TOKEN ACCOUNT>
Example: spl-token thaw AXXXXXXXXXXXXXXXXXXXXXXXX
You Need to: Insert the token account that you copied just now

After you done editing those parts, copy and paste your edited code into it, and click enter.
Then you will see message like this as shown in the picture below.

*#Now the token account that you blacklisted before is now remove from blacklist and able to transfer token freely and sell the token.
How to Print Token
71)Go to Visual Studio Code, Copy the below code, and change the token address into your token address, and also how much amount of token you want to print (If you want to print 20000 amount of your token, just write 20000 in the Token Amount):
spl-token mint <Token Address> <Token Amount>
Example:
spl-token mint BXXXXXXXXXXXXXXXXXXX 20000
You need to:
-Insert your token address (see step 39 to find your token address)
-Insert how much amount of token you want to create (If you want to print 20000 amount of your token, just write 20000 in the Token Amount)
In the picture below, if you decide to print 20000 amount of token, just write 20000 like shown in the picture below.

After you done editing those parts, copy and paste your edited code into it, and click enter.
72)Then you will see this message as shown in the picture below, lets move to the next step.

73)Now back to Visual Studio Code, Copy and edit the below code, Change token address into your token address (step 39), then insert how much token you want to send to your Phantom wallet, and also insert your Phantom wallet solana address into wallet address:
spl-token transfer <token-address> <token-amount> <wallet-address> --fund-recipient
Example:
spl-token transfer BXXXXXXXXXXXXXXXXXXXXXXXX 10000 FXXXXXXXXXXXXXXXXXXXXXXX --fund-recipient
You need to:
-Insert your token address (see step 39 to find your token address)
-Insert how much amount of token you want to transfer to Phantom Wallet address, Usually we will send it all. (If you want to send 10000 amount of your token, just write 10000 in the token amount)
-Insert your Phantom wallet solana address (see step 47 to find your Phantom wallet solana address)

After you done editing those parts, copy and paste your edited code into it, and click enter.
74)You will see this message show that the transfer is successful (If you didn’t fund your Phantom wallet, you will 100% encounter errors)

Now your token is now inside your Phantom wallet.
Part 5: How to Remove Liquidity in Raydium Solana
Remove Liquidity in Raydium Solana
75)Go to https://raydium.io/
76)Click Portfolio

77)Click the button in the red circle as shown in the picture below.

78)Select how much percent % of liquidity you want to remove, usually we will do a 100% liquidity remove. Then click Confirm

79)Confirm the Phantom wallet pop-up.

After you remove liquidity successfully, you will see this message as shown in the picture below. You SOL token will be in your Phantom wallet.

That is all from now, in my opinion. Ofcuz, this is not the end, there are many ways and techniques you can do with this token in order to maximize the effect.
We will discuss more about token tips and techniques in our next post.
Good luck with your tokens!
Looking to Create Tokens in Ethereum, Binance Smart Chain, Base, Arbitrum and others? We got what you need! View those links below:
Normal Token Smart Contract Codes Series:
Link to Upgraded V2 Non-Honeypot Normal Low Gas Fee Meme Token with Automatic Ownership Renounce Smart Contract Code Now: https://www.createyourowntoken.net/copy-of-auto-ownership-renounce-norma
Link to Non Honeypot (Non-Honeypot, Normal Low Gas Fee Meme Token with Automatic Ownership Renounce) Token Code: https://www.createyourowntoken.net/copy-of-ownership-renounce-normal-mem
Link to Non Honeypot (Upgraded Version V2, Non-Honeypot, Normal Meme Token, with Unlimited Token Supply Printing Function) Token Code: https://www.createyourowntoken.net/copy-of-v2-blacklist-detector-proof
Link to Non Honeypot (Non-Honeypot, Normal Meme Token with Ownership Renounce Function) Token Code: https://www.createyourowntoken.net/copy-of-supply-printing-normal-meme-t
Link to Non-Honeypot Normal Meme Token with Unlimited Supply Printing Smart Contract Code:https://www.createyourowntoken.net/copy-of-normal-meme-token-similar-to
Link to Non-Honeypot Normal Meme Token (like PEPE Token) Smart Contract Code: https://www.createyourowntoken.net/copy-of-switch-on-off-honeypot-mode-t
Honeypot Smart Contract Codes Series:
Link to Upgraded V2 Whitelist + Switch On/Off Honeypot Mode + Undetectable Honeypot Smart Contract Code: https://www.createyourowntoken.net/copy-of-whitelist-switch-on-off-hon-1
Link to Upgraded Version V2 Blacklist + Undetectable Honeypot, Honeypot Scanner & Detector Proof Smart Contract Code: https://www.createyourowntoken.net/copy-of-detector-proof-honeypot-1
Link to Whitelist + Switch On & Off Honeypot Mode + Honeypot Detector Proof Smart Contract Code:https://www.createyourowntoken.net/copy-of-switch-on-off-honeypot-mode-t-1
Link to Switch On & Off Honeypot Mode + Honeypot Detector Proof Smart Contract Code:https://www.createyourowntoken.net/copy-of-detector-proof-honeypot
Link to Blacklist + Honeypot Detector-Proof Smart Contract Code: https://www.createyourowntoken.net/detector-proof-honeypot
Link to Whitelist + Anti-Bots Smart Contract Code: https://www.createyourowntoken.net/copy-of-honeypot-code-v1-0
Link to Standard Honeypot Smart Contract Code:
Some more Important Information...
Learn How Much Liquidity You Should Add & What To Do (Recommended for Honeypot tokens Only): https://www.createyourowntoken.net/post/little-techniques-on-marketing-your-tokens
Learn How to Attract People to Buy Your Tokens (Recommended for Honeypot tokens Only): https://www.createyourowntoken.net/post/little-techniques-on-marketing-your-tokens
Learn How to Add Network and Change Network (BASE, Arbitrum, BSC and other blockchains) in Your Metamask Wallet: https://www.createyourowntoken.net/post/how-to-add-network-and-change-network-in-your-metamask-wallet
Any queries?
Contact me on Telegram: https://t.me/devswanson
My website: https://www.createyourowntoken.net/
Comments